
微信公众号开发
内网穿透
1.方式一.有自己的域名和外网主机.通过ssh通道将外网服务器上的指定端口映射到本地内网端口. 【推荐】
内网开发机设置好ssh 免密登陆.将本地ssh public key 上传到目标服务器
开发环境
[oo@oo .ssh]$ cat ~/.ssh/id_rsa.pub | ssh root@114.116.5.13 'cat >> .ssh/authorized_keys'

nano ~/.ssh/config
Host lets-dev
    HostName 114.116.5.13
    User root
    PubkeyAuthentication yes

测试环境
[oo@oo .ssh]$ cat ~/.ssh/id_rsa.pub | ssh root@114.116.13.141 'cat >> .ssh/authorized_keys'
nano ~/.ssh/config
Host lets-test
    HostName 114.116.13.141
    User root
    PubkeyAuthentication yes

eg. 示例
Host www
    HostName www.ttlsa.com
    Port 22
    User root
    IdentityFile ~/.ssh/id_rsa.pub
    IdentitiesOnly yes

开启sshd
查看 是否安装
rpm -qa|grep -E "openssh"
安装
sudo yum install openssh*
启动
sudo systemctl enable sshd
sudo systemctl start sshd 或者
service sshd start

打开
/etc/ssh/sshd_config
GatewayPorts yes
这个选项的意思是,SSH 隧道监听的服务的 IP 是对外开放的 0.0.0.0,而不是只对本机的 127.0.0.1。不开 GatewayPorts 的后果是不能通过 12.34.56.78:8080 访问,只能在外网服务器上通过 127.0.0.1:8080 服务到本地开发机的服务

远程端口映射
[oo@oo ~]$ ssh -NT -R 28082:localhost:8082 root@114.116.5.13
确保外网主机端口28082没有没占用。GatewayPorts yes 打开,sshd服务启动。可以用-NTf 参数在后台运行。
也可以用autossh
sudo pacman -S autossh
[oo@oo ~]$ autossh -p 22 -M 28080 -N -R 28082:localhost:8082 root@114.116.5.13
* -p 22: vps ssh 端口,默认值22
* -M 28080: 中继服务器(vps)的代理服务监听端口,需保证不被vps其它进程占用
* -NR '*:28082:localhost:8082': 端口映射,vps的27401端口映射到内网PC的27402端口
* root@114.116.5.13: vps的用户名及IP
* 如果80端口无法查看,需要在远程服务器用nginx 将80 转发到远程的28082 然后用ssh隧道即可
如果命令执行成功,还是无法访问,检查nginx是否启动,nginx的配置转发是否成功
-f 后台执行
[root@letstest zhht]# autossh -p 22 -f -M 38080 -N -R 38083:localhost:3003 root@119.3.29.0
[root@letstest zhht]# ps -ef |grep autossh
root 95363 1 0 11:21 ? 00:00:00 autossh -p 22 -M 38080 -N -R 38083:localhost:3003 root@119.3.29.0
root 95390 23082 0 11:22 pts/0 00:00:00 grep --color=auto autossh

注意事项:没有动过任何配置,转发失败,无法访问转发后的端口网址信息。解决办法如下
1.在外网IP主机上执行 lsof -i:38083 查看占用端口的进程
[root@nginx ~]# lsof -i:38083
COMMAND PID USER FD TYPE DEVICE SIZE/OFF NODE NAME
sshd 6138 root 10u IPv4 21516891 0t0 TCP *:38083 (LISTEN)
sshd 6138 root 11u IPv6 21516892 0t0 TCP *:38083 (LISTEN)

2.删除进程kill -9 6138
3.在目标主机(内网主机)上kill autossh进程后再重新执行autossh建立新的通道
4.在外网IP主机执行nginx -s reload命令重新转发外网访问到本地38083端口
2.方式二 ngrok
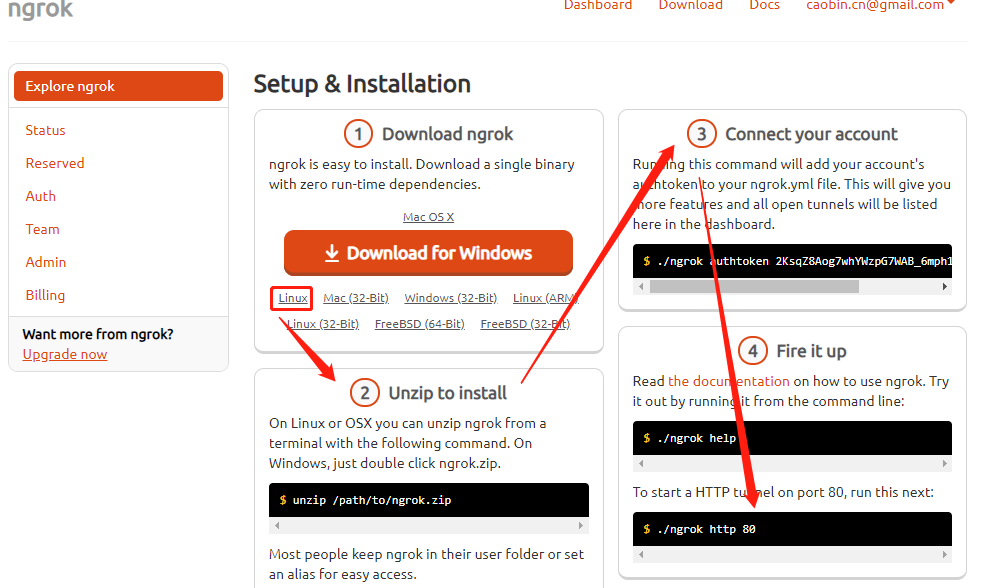
国内推荐 http://www.ngrok.cc/ 这个网站已经ICP备案,可以通过微信的网页授权域名设置!!! ngrok已经被微信拉黑
注册ngrok->下载对应linux版本(or windows)->解压->添加授权配置,执行ngrok dashboard 上的命令--> 执行命令 ngrok http 8082 会有一个随机的二级域名,重新运行命令后重新生产新的二级域名
3.方式3 通过npm 组件localtunnel实现
npm install -g localtunnel
lt --port <your localhost port> --subdomain youruniquesubdomain
访问 http://youruniquesubdomain.localtunnel.me
[oo@oo localtunnel-1.9.2]$ sudo npm install -g localtunnel
[sudo] oo 的密码:
/usr/bin/lt -> /usr/lib/node_modules/localtunnel/bin/client
+ localtunnel@1.9.2
added 55 packages from 34 contributors in 13.467s
[oo@oo localtunnel-1.9.2]$ lt --port 8082 --subdomain caobin
your url is: https://caobin.localtunnel.me
微信公众号URL配置
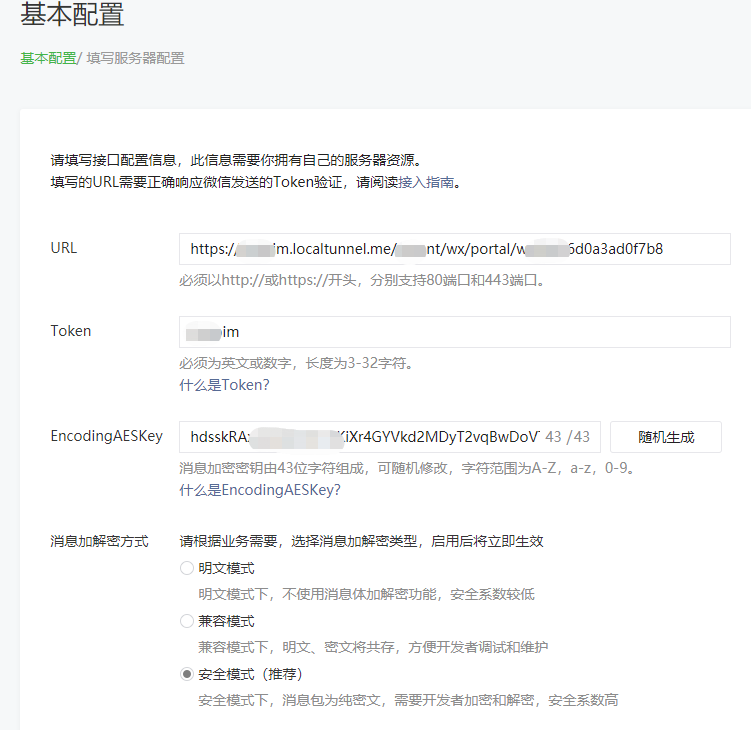
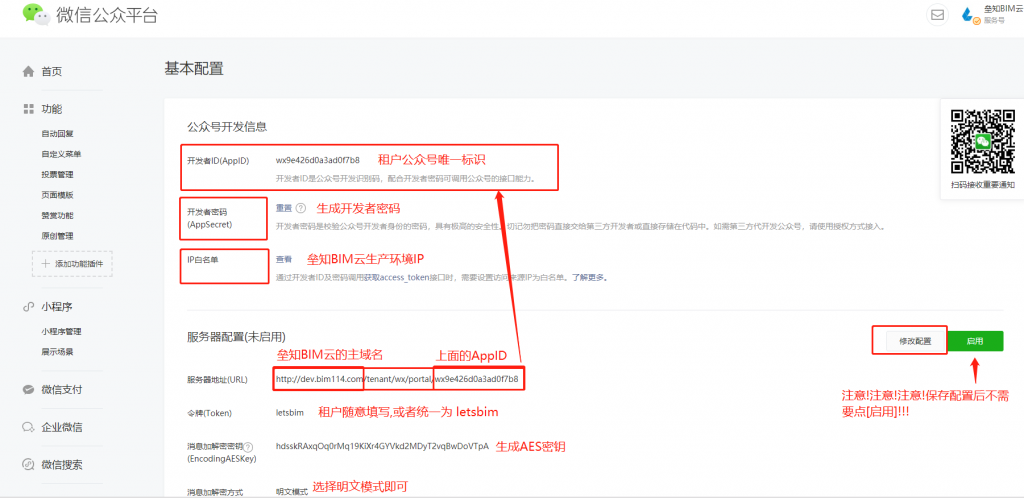
请注意:上面配置成功后,要点右边的启用,消息将转发到服务器配置中
需要注意,上面的URL是需要返回echostr字符串内容.这个内容不能有双引号,否则验证不通过!!!如果使用了fastjson这种全局json工具,可以使用HttpServletResponse 的writer进行输出.具体问题见FastJsonHttpMessageConverter对返回字符串多加一个双引号的问题
package com.bimstudy.controller;

import com.baomidou.mybatisplus.core.metadata.IPage;
import com.baomidou.mybatisplus.extension.plugins.pagination.Page;
import com.bimstudy.annotation.Log;
import com.bimstudy.annotation.Pass;
import com.bimstudy.base.Constant;
import com.bimstudy.config.ResponseHelper;
import com.bimstudy.config.ResponseModel;
import com.bimstudy.exception.NotFoundException;
import com.bimstudy.exception.ParamJsonException;
import com.bimstudy.service.ICourseService;
import com.bimstudy.vo.CourseDetails;
import com.bimstudy.vo.CourseSaveVO;
import com.bimstudy.vo.CourseUpdateVO;
import com.bimstudy.vo.CourseVO;
import io.swagger.annotations.Api;
import io.swagger.annotations.ApiImplicitParam;
import io.swagger.annotations.ApiImplicitParams;
import io.swagger.annotations.ApiOperation;
import lombok.AllArgsConstructor;
import lombok.SneakyThrows;
import lombok.extern.slf4j.Slf4j;
import me.chanjar.weixin.mp.api.WxMpMessageRouter;
import me.chanjar.weixin.mp.api.WxMpService;
import me.chanjar.weixin.mp.bean.message.WxMpXmlMessage;
import me.chanjar.weixin.mp.bean.message.WxMpXmlOutMessage;
import org.apache.commons.lang3.StringUtils;
import org.apache.shiro.authz.annotation.RequiresPermissions;
import org.springframework.beans.factory.annotation.Autowired;
import org.springframework.web.bind.annotation.*;

import javax.servlet.http.HttpServletResponse;
import javax.validation.Valid;
import java.io.PrintWriter;
import java.util.List;

/**
 * 微信
 */
@RestController
@AllArgsConstructor
@Slf4j
@Api(description = "微信" )
@RequestMapping("/wx/portal/{appid}")
public class WxPortalController {

    private final WxMpService wxService;
    private final WxMpMessageRouter messageRouter;

    @Pass
    @SneakyThrows
    @GetMapping(produces = "text/plain;charset=utf-8")
    public void authGet(@PathVariable String appid,
                          @RequestParam(name = "signature", required = false) String signature,
                          @RequestParam(name = "timestamp", required = false) String timestamp,
                          @RequestParam(name = "nonce", required = false) String nonce,
                          @RequestParam(name = "echostr", required = false) String echostr, HttpServletResponse response) {

        log.info("\n接收到来自微信服务器的认证消息:[{}, {}, {}, {}]", signature,
                timestamp, nonce, echostr);
        if (StringUtils.isAnyBlank(signature, timestamp, nonce, echostr)) {
            throw new ParamJsonException("请求参数非法,请核实!");
        }

        if (!this.wxService.switchover(appid)) {
            throw new NotFoundException(String.format("未找到对应appid=[%s]的配置,请核实!", appid));
        }

        if (wxService.checkSignature(timestamp, nonce, signature)) {
            PrintWriter writer = response.getWriter();
            writer.write(echostr);
            writer.flush();
        }

    }

    @Pass
    @SneakyThrows
    @GetMapping(value = "/portal/callback")
    public String post(HttpServletRequest request,
                       @RequestParam String code,
                       @RequestParam String state) {
        String host = request.getHeader("host");
        log.info("weixin host:{},code:{},state:{} ", host,code,state);
        Assert.isTrue(!StringUtils.isAnyBlank(host, code, state), BusinessExceptionCode.PARAM_JSON_EXCEPTION_CODE);
        WxMpOAuth2AccessToken accessToken = wxService.oauth2getAccessToken(code);
        String openId = accessToken.getOpenId();

        String jsonString = JsonUtil.getJsonString(accessToken);
        log.info(jsonString);
        return jsonString;
    }

    @Pass
    @PostMapping(produces = "application/xml; charset=UTF-8")
    public String post(@PathVariable String appid,
                       @RequestBody String requestBody,
                       @RequestParam("signature") String signature,
                       @RequestParam("timestamp") String timestamp,
                       @RequestParam("nonce") String nonce,
                       @RequestParam("openid") String openid,
                       @RequestParam(name = "encrypt_type", required = false) String encType,
                       @RequestParam(name = "msg_signature", required = false) String msgSignature) {
        log.info("\n接收微信请求:[openid=[{}], [signature=[{}], encType=[{}], msgSignature=[{}],"
                        + " timestamp=[{}], nonce=[{}], requestBody=[\n{}\n] ",
                openid, signature, encType, msgSignature, timestamp, nonce, requestBody);

        if (!this.wxService.switchover(appid)) {
            throw new NotFoundException(String.format("未找到对应appid=[%s]的配置,请核实!", appid));
        }

        if (!wxService.checkSignature(timestamp, nonce, signature)) {
            throw new ParamJsonException("非法请求,可能属于伪造的请求!");
        }

        String out = null;
        if (encType == null) {
            // 明文传输的消息
            WxMpXmlMessage inMessage = WxMpXmlMessage.fromXml(requestBody);
            WxMpXmlOutMessage outMessage = this.route(inMessage);
            if (outMessage == null) {
                return "";
            }

            out = outMessage.toXml();
        } else if ("aes".equalsIgnoreCase(encType)) {
            // aes加密的消息
            WxMpXmlMessage inMessage = WxMpXmlMessage.fromEncryptedXml(requestBody, wxService.getWxMpConfigStorage(),
                    timestamp, nonce, msgSignature);
            log.debug("\n消息解密后内容为:\n{} ", inMessage.toString());
            WxMpXmlOutMessage outMessage = this.route(inMessage);
            if (outMessage == null) {
                return "";
            }

            out = outMessage.toEncryptedXml(wxService.getWxMpConfigStorage());
        }

        log.debug("\n组装回复信息:{}", out);
        return out;
    }

    private WxMpXmlOutMessage route(WxMpXmlMessage message) {
        try {
            return this.messageRouter.route(message);
        } catch (Exception e) {
            log.error("路由消息时出现异常!", e);
        }

        return null;
    }

}
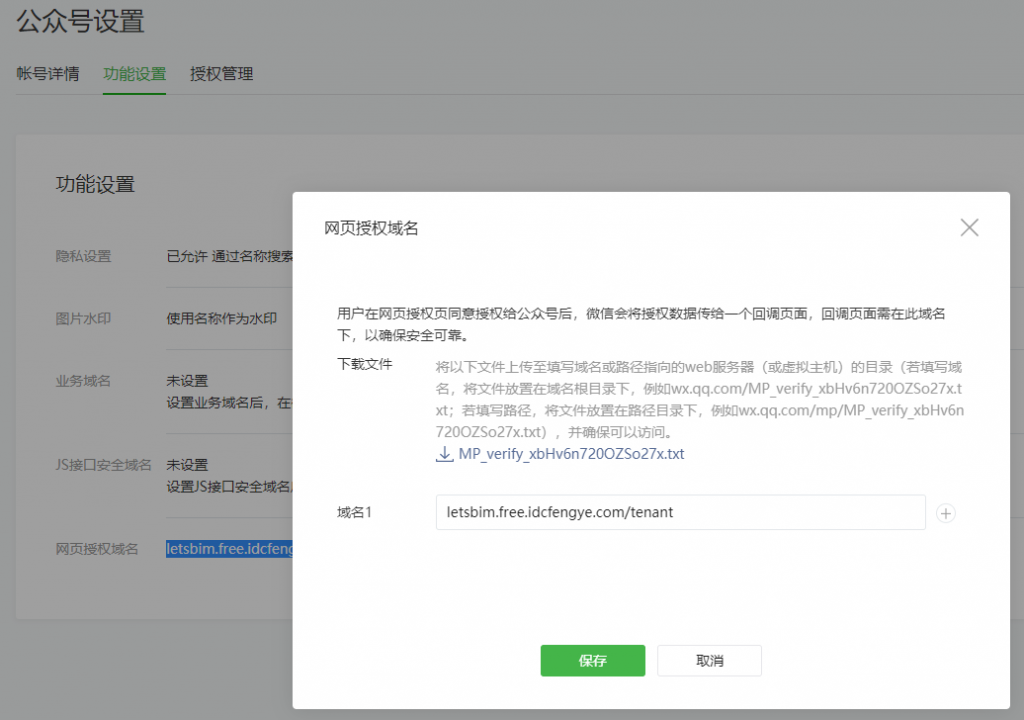
微信后天-开发->接口权限->网页服务->网页授权->网页授权获取用户基本信息->修改->网页授权域名-设置.填入二级域名letsbim.free.idcfengye.com/tenant,不含http
可以将文件放到nginx下
    server {
         listen       80;
         server_name  bim114.com;
         root         /usr/share/nginx/html;

         location ~* \.(txt)$ {
            root /usr/share/nginx/wx/;
         }

         location ^~ /tenant/ {
			client_max_body_size    1000m;
			proxy_pass http://127.0.0.1:28082;
         }

         location ^~ /admin/ {
			client_max_body_size    1000m;
			proxy_pass http://127.0.0.1:28082;
         }
	}
授权回调
微信app内打开如下链接可测试回调是否正常.如果用户同意授权,页面将跳转至 redirect_uri/?code=CODE&state=STATE。
可以为https 或者http.开发简单点就http
snsapi_base 不弹框
snsapi_userinfo 弹框授权
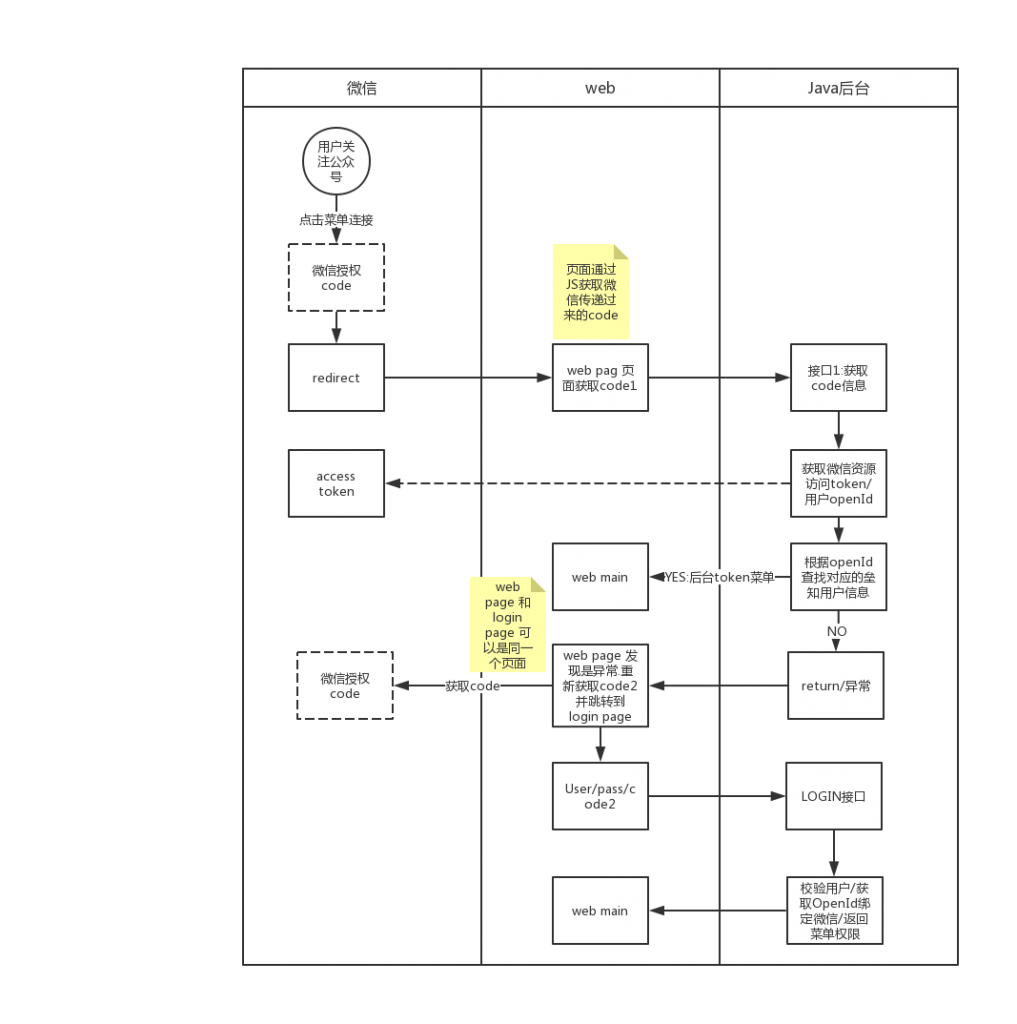
微信公众号登陆流程
测试公众号注意事项:配置JS SDK域名的时候,只需要指定域名即可,不包括路径和http头部,否则会报redirect url错误

测试公众号添加菜单
https://mp.weixin.qq.com/debug/
获取测试token 替换对应的appid 和secret
https://api.weixin.qq.com/cgi-bin/token?grant_type=client_credential&appid=wx5761ffd5b0466a6&secret=8e099c8cbeb8f331e0066fbd2a9e4686
自定义菜单-> 列表create
设置测试菜单
{
    "button":[
	{
           "name":"智慧工地",
		   "type":"view",
		   "url":"http://open.weixin.qq.com/connect/oauth2/authorize?appid=wx5761ffd5b0466a6d&redirect_uri=http://ssmppre.letsbim.net&response_type=code&scope=snsapi_base&state=snsapi_base,wx5761ffd5b0466a6d#wechat_redirect"
        }
     ]
}
问题记录:
1.如果在公众号后台修改了菜单的callback URL.需要推出微信PC客户端,才能获取新的url,不然桌面客户端的URL未更新,导致请求路径错误